With the death of Basic Auth a lot of “Admin Scripts” doing…stuff are dead or dying. In https://www.matts-stuff.co.uk/2022/08/18/application-registration-for-accessing-mailboxes/ I went through using an app registration and Exchange App Access Policy to allow an app to send and receive as a single mailbox. The other thing people seem to want to do is manage files and folders in SharePoint, ad the main way I seem to see this done is an App registration with the APPLICATION permission Files.ReadWrite.All, so you know just a client id and secret that can do whatever it wants to whatever data you have.
My still shoddy (but potentially less apocalyptically so) method is to use Resource Owner Password token requests. Here we can at least use delegated API permissions.,
Disclaimer – DO NOT USE this method as you need to capture and pass a password. Better ways exist. Use MSAL. Unless, you know, you have to.
So that said lets get going.
1 Create App Registration
2 Check we can generate our token (Optional)
3 Set up SharePoint site and access
4 Do stuff with SharePoint
5 Add API Permissions
4….Continued
1 Create App Registration
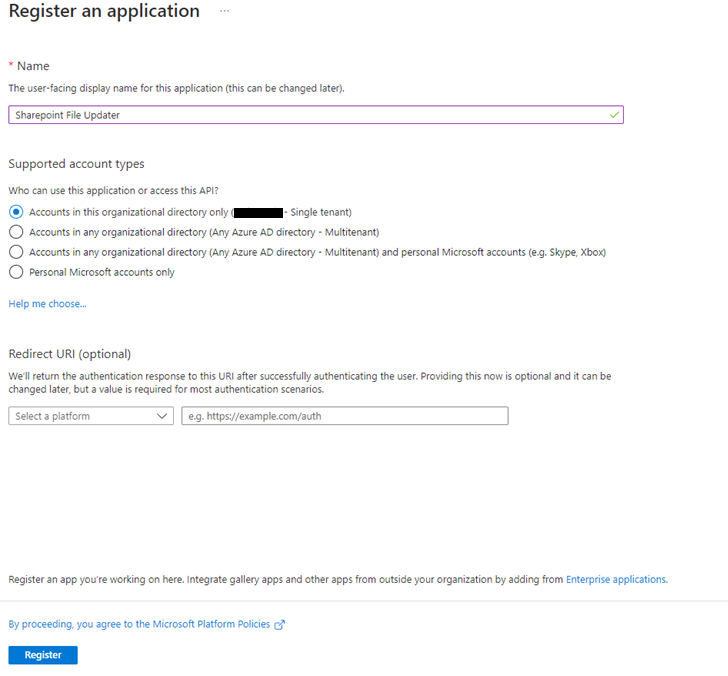
So first we need an app registration, pop into aad.portal.azure.com | Azure AD | App Registrations and hit New then create and App Registration with a nice name indicating what you want it to do.
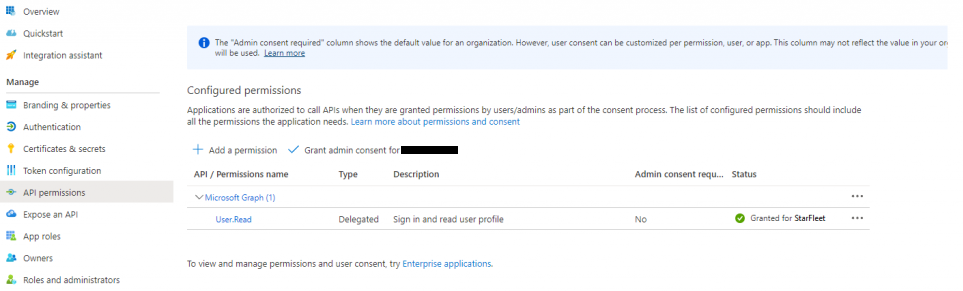
Now we can go into the new app registration, into the API Permissions and grant admin connect for the existing permissions (User.Read Delegated):
Now we can create a client secret for our app:
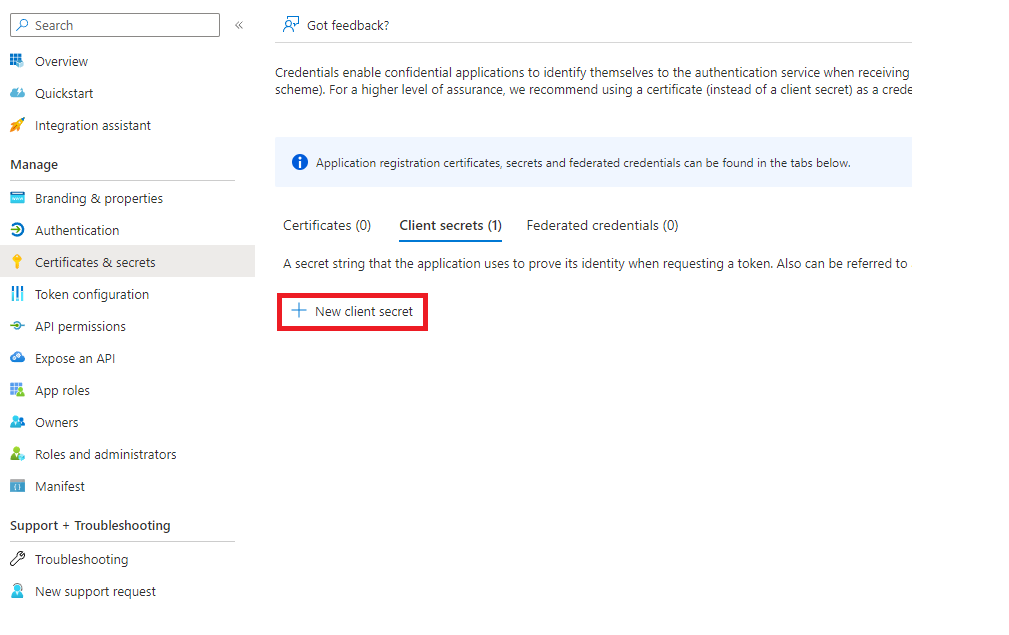
DON’T FORGET TO RECORD THE SECRET VALUE!!
2 Check we can generate our token (Optional)
Okay so as per the App Registration/Exchange app access policy article I like to test everything at each step so I can check it does what I want and understand at least enough of what going on to blag it to someone that actually knows.
So fire up postman and create a new POST:
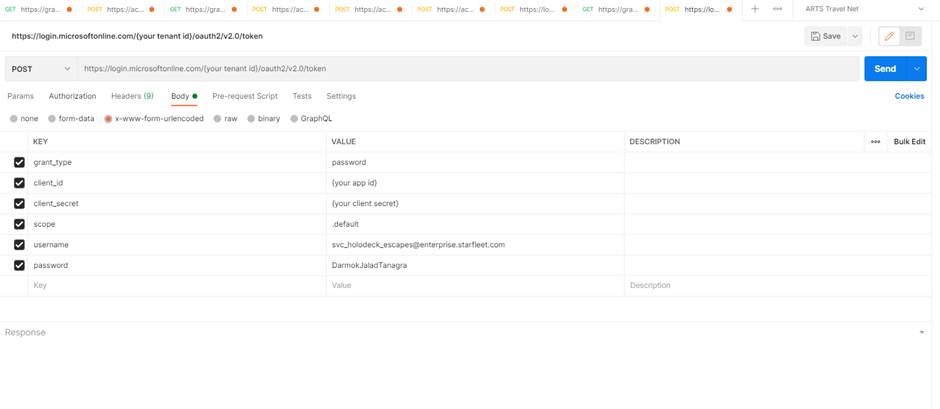
We’re using our normal token endpoint but now the grant type is password and we are sending a user UPN and password. Send it and hopefully you will get a nice token back:

Yay.
3 Set up SharePoint site and access
We can now use our token to try and read a SharePoint site via api; Create a new “Get” in Postman, whack in a new header for Authorization and stick “Bearer {your bearer token from step2}” in as the value and the URL for getting the site in Graph and Send it (Here I’m looking at a site called https://starfleet.sharepoint.com/teams/t-OAuthAccess) :
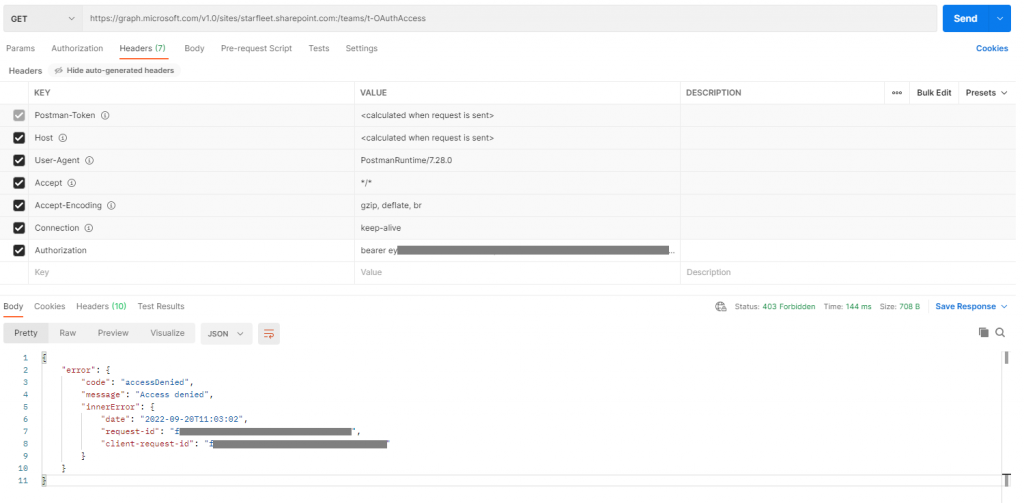
Oh no! Access Denied! Oh wait, Oh yay access denied, we haven’t given our user account access to the site yet.
Pop into SharePoint admin and give the user in step 2 access to the site, then regenerate the token and run the Get again with the new token, this time you will get some site details:
{
    "@odata.context": "https://graph.microsoft.com/v1.0/$metadata#sites/$entity",
    "createdDateTime": "2022-09-20T10:40:04.5Z",
    "description": "t-OAuthAccess",
    "id": "starfleet.sharepoint.com,3…,f…",
    "lastModifiedDateTime": "2022-09-20T10:53:10Z",
    "name": "t-OAuthAccess",
    "webUrl": "https://starfleet.sharepoint.com/teams/t-OAuthAccess",
    "displayName": "t-OAuthAccess",
    "root": {},
    "siteCollection": {
        "hostname": " starfleet.sharepoint.com"
    }
}
See that id string? That’s important, we want that….
4 Do stuff with SharePoint
Okay, Great – we have a method for auto-magically opening a SharePoint site in graph as a user. Now lets actually do something with it – the most likely requirement is creating, reading and updating files and folders.
Document libraries are referred to as drives and the first thing we need is to find the drive id we want to work with.
Remember that id string I said we wanted in section 3? You’re going to want that and to make a new GET in postman to:
https://graph.microsoft.com/v1.0/sites/{your id string}/drives
you want to maintain your authorization header using your generated token:
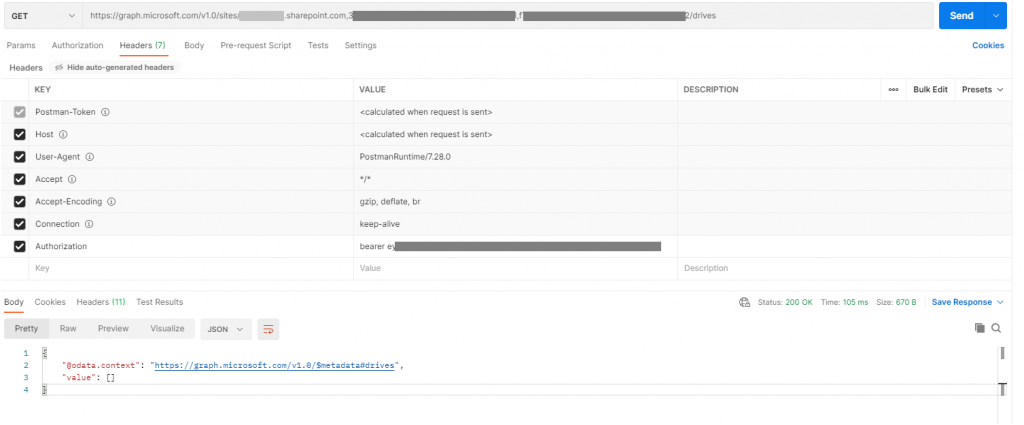
And my god! Oh No! Its blank! All our data is gone! Or we just haven’t added the API permissions yet…
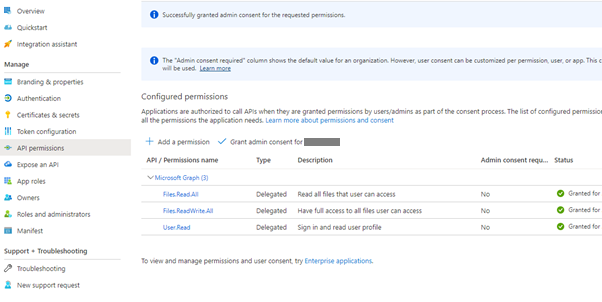
5 Add API Permissions
Head back into aad.portal.azure.com and locate your app registration, Head down to API Permissions and Add the Graph API Permissions
Files.Read.All
Files.ReadWrite.All
Both DELEGATED NOT APP!!!
You can consent to them administratively if you don’t want to do it manually for the delegated account(s)
4….Continued
Okay so now you have added the api permissions and consented for your account or all accounts lets regenerate the token in postman (notice the expanded scopes)

Then you can update the authorization header in your GET for the drives and run it again:
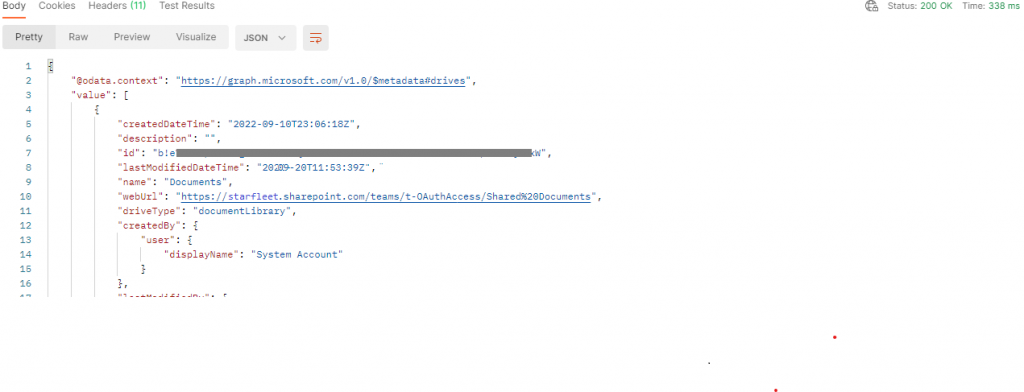
From here you can get the items in the drive using the same authorization token and querying the drive ID returned above with /root/children
https://graph.microsoft.com/v1.0/sites/arrivagroup.sharepoint.com,3xxxxxx-xxxx-xxxx-xxxx-xxxxxxxxxxx, fxxxxxx-xxxx-xxxx-xxxx-xxxxxxxxxx/drives/b!xxxxxxxxxxxxxxxW/root/children
Yay!
I’m not going to document all of the capabilities of Graph API for file manipulation (although I may makes some basic notes shortly on the main functions I ever use), suffice to say you now have a handy method to generate a token on behalf of a user without manual intervention. You shouldn’t use it. Unless you want to.
![]()