This post continues the documentation of a single project – migration of a bunch of users between two 365 tenants. This is Part Four which goes over the data migration using Quest On-Demand1
It is not necessary to use this product, basically any of the many products which will migrate the mail, onedrive, teams and groups data will do for this step
Part One – Introduction and Approach
Part Two – Identifying Users and Objects
Part Three – Setup of New Tenant
Part Four – Data Migration with Quest-On-Demand
Part Five – Domain Migration
Part Six – Destination Tenant User Setup
All the scripts for this project are available at https://github.com/jmattmacd/O365-Tenant_to_tenant
As per Part One the approach taken here is to pre-seed create the user object then pre-seed the data into the new tenant and allow soft matching with AD Connect to link the on premises accounts back up with their new cloud identities.
The are a load of third party products in this space, I chose Quest primarily as it will migrate accounts, mailboxes and permissions, OneDrives, Shared Mailboxes, O365 groups and related content, Teams including chat histories, SharePoint libraries all without any installs or infrastructure creating. Its also pretty well priced in the space and – of key importance – they got back to me and demo’d the product with an actual technical resource really fast. On such little things decisions are made:)
It’s not perfect, there are some gotchas and some deficiencies, I’ll try to point them out as I go through the process
Licensing is per User and there are two “levels” – one includes the SharePoint/Teams/Groups part one doesn’t.
Tenant Preparation and Setup of Quest
First thing you should do on this or any migration project is log a call with Microsoft support from each tenant asking them to remove the thresholds on EwsMaxBurst, EwsRechargeRate, EwsCutoffBalance. Theyll eventually get back in touch, and ask for how long, give yourself a month after projected end date.
Next thing (actually chronologically the first thing) is work out how much recoverable mailbox data you want to keep and if possible remove your target accounts from any Retention Policy in protection.office.com. Dealing with full dumpsters and retention was a nightmare, now they have removed the Search-Mailbox cmdlet from support its a complete disaster. Get your accounts removed from retention if possible as early as possible and the the Managed Folder Assistant dump excess mail.
Now you need a GA account on the source and target tenant without MFA. Its not exactly great but needs must. You also need to create yourself a new admin role group with the Application Impersonation Role and put this account in it, you can use the script below just run it against both tenants: [10-add_impersonation_role.ps1]
($username require setting – remember to change it as you run it against each tenant)
# connect-exchangeonline
$username = "GlobalAdminUser@domain.com"

New-RoleGroup -Name "OnDemandMigration" -Description "Temprorary Role Group For Migration" -Roles "ApplicationImpersonation" -Members $username
So the tenants are now set, its time to set up Quest. There’s a good admin guide so I wont go through every step. Basically you are going to go into Tenants and connect to both tenants, youll have to og in to each to grant consent to a load rights…then…Wait for a bit – I just left it a day as I had time – and when you come back go back into tenants and the user counts should be about right.
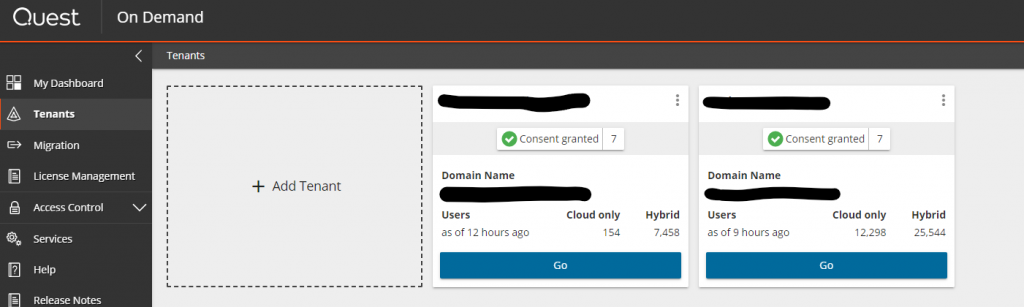
Last bit of setup is to create the migration project. Roughly, click migration, follow the wizard to set up your source and target teant and grant various consents then its ready to go and in Migration you will see your Project.
Immediately click Open Project, then Open the Accounts page and hit configure connections. It should already be populated with the details from setting up but click the source connection, then Advanced Options and copy “https://outlook.office365.com/EWS/Exchange.asmx” into the Custom EWS URL. Do the same for the Target Connection. There I just saved you a lengthy support call after hours of failed jobs and hair pulling:)
Accounts, Mail and OneDrives
Quest is really two tools stitched sort of together, or at least sharing an interface. The Accounts, Mail and OneDrive section is effectively unconnected with the SharePoint, Teams and groups section. So I’ll look at them separately.
An annoyance with Quest is that its designed around doing things its own way and doesn’t cater brilliantly when that not what you’re doing. In theory the product id designed around your source and target domains coexisting of some time, it causes a few issues and gotchas which I’ll hopefully remember to tell you about.
The process is quest is pretty simple. Back in Quest go back into the Migration, Open the Project then go into accounts.

You’re going to want to split the accounts into Collections, I split them into about 1000 accounts each by priority. Don’t forget you’ll need to include Shared Mailboxes in a collection! Even is you’re only doing a few hundred account your want them in a collection first. Hit the drop down in the top right corner then new collection, give your collection a name then once its done go back to collections and select your new collection in the drop down so you are in the empty collection.
Now you can hit that “Fill From File” Button. You just need to import a list off the UPNs for that collection with the column header “UPN”. It’ll run off and do it’s stuff then you’ll have a dashboard with a load of new accounts. Create all of your collections then using the collections drop down shift to “Show All”, its time to do some discovery.
Click into the Accounts tab and you’ll see all of your accounts listed, obviously I’ve hidden them here
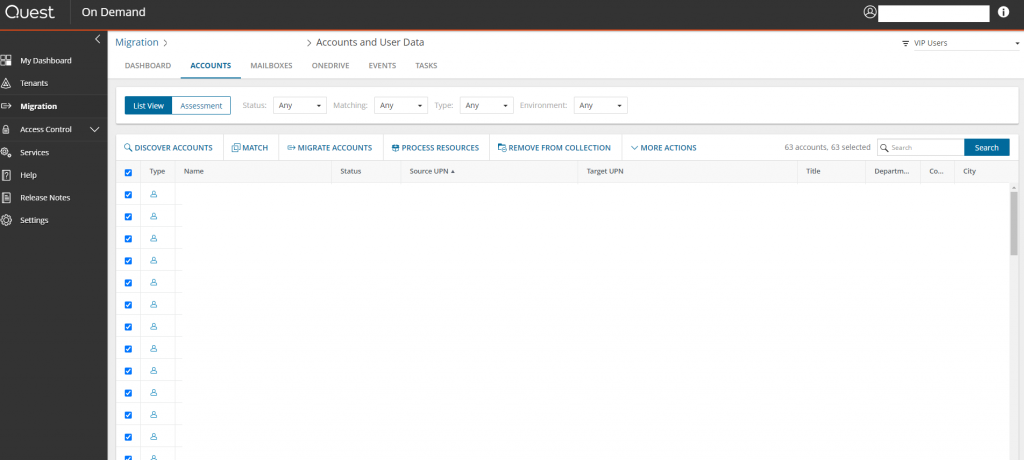
Click Discover Accounts and Run a discovery task now. Don’t click the Include Statistics check box, we already gathered the statistics and it just makes the job take an appallingly long time. Once it completes its gone and found all the mailbox and OneDrive info so we can start some work.
If you drop down to your first collection – I had a pilot one of just a few accounts as I hadn’t used the software before – the accounts page will be limited to that collection. Click the select all button and hit match. We can match here on mailNickname – by outstanding coincidence its one of the attributes we seeded into the target tenant so we should see 100% match. You can match on other attributes such as display name, but we dont need to. You can also provide manual matching files if you have a need to migrate accounts on one side to entirely different accounts on the other, its all in the admin guide. Do the matching for all of your collections before migrating anything
Anyway, once matching completes you just pop over into the mailbox tab, select all of your accounts and hit migrate mail. The first screen will ask about licensing, its one of those things I mentioned were designed around Quest wanting to do things its own way and it wants to do the licensing of target accounts for you. You cant turn this page off but our licenses are already applied, if you select any license and leave the options at default it wont change anything. Continue through the wizard and you can tell it to migrate to specific folders, include OWA rules, delegation, folder permissions (only where there’s a matched account in the target tenant, hence running matching first). You can exclude folders and set date ranges and schedules at you would expect.
My usual approach here would be to run a months back date, then yearly, then 5 yearly then all for each collection so that if we reached the switch over date and it hadnt finished everyone would have at least their most recent mail. It quickly became apparent that was unnecessary so I just ran everything for a collection then ran the next collection. I ran nearly 8k mailboxes containing 15TB in 3 weeks like that and that was just me running jobs so there was a fair amount of downtime. An extra week would have been better, but thats always the case.
Some notes on this….
First off EWS bottle-necking. This is the main throttle in migration and, even when you have the throttles I listed above removed, its still the main headache. If you are running enough connections you will see errors. A biggie is “The account does not have permission to impersonate the requested user”. This looks like you didn’t set up your account properly but it’s a throttle or service limit, rerunning the job without any change will work perfectly. If you try to replicate the issue in ewseditor2 you *might* get it to do it one time in a hundred. You can do as I did an log it with Microsoft support but after a few days of chasing circles they’ll say it’s Quests problem (regardless of visibility in EWSEditor) and close the call. The solution is to go slowly, don’t run multiple Mailbox migration tasks concurrently.
Second issue is Mail item size. The largest mail you can have in a 365 mailbox is 150MB which is great. Except when you migrate mail (or send externally) it gets transcoded to MIME/Base64 which has 30% size overhead so the largest mail you can actually send or migrate is 112MB. If at some point an admin has taken the Mailbox item size limits off your exchange you wont be able to migrate anything larger than that. Critical stuff you’ll need to identify and PST out. Everything else is getting left behind. The solution is pretty simple – Never set the mail size limit above 110MB
Third. You can, for some unknown reason, use a full unicode character set including cute little stuff like ? in folder names in your mailbox. Don’t believe me do you?

This causes havoc with the migration. You’ll see it in the logs in Quest and can then use MFCMapi3 to take them out on your source side and re-run the migration job for that mailbox.
Fourthly. Remember how I said Quest was designed around its own methodology using coexistence between the two tenants? Well to support this the first thing it does when migrating mailboxes is stick a Forwarding SMTP Address and mark the mailbox to deliver and not forward on the target tenant. This is incredibly annoying so after each job, and certainly before going live you need to remove it: On the TARGET tenant, running it on your live tenant will result in every purposely set rule being removed and you needing to come up with an excuse for the blank space on your CV! [11-remove_quest_forwarding_rules.ps1]
# connect-exchangeonline
$mbxs = get-mailbox -ResultSize unlimited | where {$_.ForwardingSMTPAddress -ne $null}
ForEach ($mbx in $mbxs) {
    Set-Mailbox -Identity $mbx.Alias -ForwardingSmtpAddress $null -DeliverToMailboxAndForward $True
}
Teams and Groups (and SharePoint)
So the experience for Accounts and account data is pretty nice and polished. The other side, Teams Groups and Sharepoint is….less so.
It looks pretty much the same:
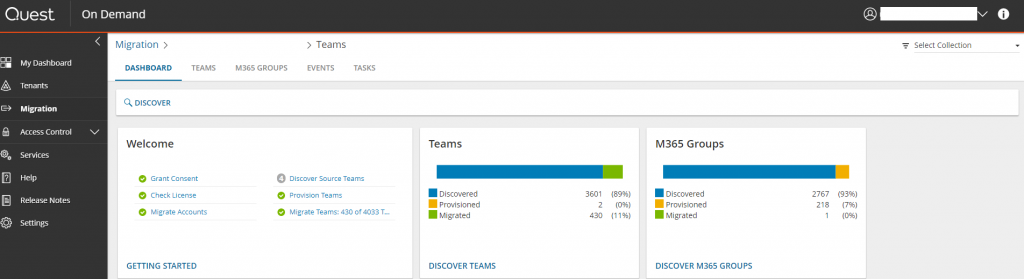
But…
Okay the select collection dropdown is decorative on this side, there no matching (obviously – teams and groups don’t exist yet) and worst of all theres no import from list.
In part 1 we identified and exported every group and team in 03-output-groups_and_members.csv and 04-Output-teams.csv. Now you have to switch to the teams tab and manually locate and select every in scope team then hit Provision to start a provision job.. Ill warn you, once you have the interface loaded with a few hundred teams its incredibly slow and uses a tonne of system memory. Also for some reason the sort order seems to be based on the ASCII code value not the alphabet – All capital letter are earlier than all lowercase. It is in short a nightmare when you have a few thousand of them to tick. The second best method is to use chromium edge as it was by far the best performance and tick 20 or so at a time then start the provision job as you can see the provisioned status and find your place easily. The best method by orders of magnitude is to give access and the list to someone else to do this. Sorry Dave.
Anyway, once you have the teams provisioned you need to do exactly the same with the Groups, the 03-output-groups_and_members.csv will need some work, grab the unique values for group name and drop the names from the 04-Output-teams.csv.
The whole thing is a bit of a mess on but eventually you’ll have everything in scope provisioned on target tenant. You can then filter by provisioned and run the migration jobs, I ran the whole lot in one go and went okay. It will take over memberships and permissions provided you did the account matching above, can grab all the previous versions of files and even makes a decent job at chat history, although the imported messages do have the migration account listed as the sender with a “on behalf of” the proper sender . (Remember I said the migration account should be generic not your name, that’s why, if your name is there everyone WILL try to contact you about it.)
You can also migrate SharePoint libraries pretty much the same way from this section (In fact the SharePoint migration component is fired by teams and groups migrations)
Some things to be aware of here – other than the disastrous UI implementation – are Teams wiki article and Forms/Stream/Sways/Flows.
First off wikis – Teams user seem to love starting up a wiki and they dont migrate. The source data in the SharePoint site goes over but its essentially a rebuild job.
Forms/Stream/Sways/Flows – I don’t know of anything (yet) that will migrate this stuff, a lot of it you cant even manage. Forms and sways for example you need the original user to share as a link then the target user to go in and replicate it from that link. I know there’s a user-voice request open for better management for forms but it appears to predate forms itself.
At this point you should have your data seeded up to the date you started all of this. We’ll run a delta after the switchover I had about a weeks additional data to sync.
Links
1 – Quest On Demand – https://quest-on-demand.com/#/
2 – EWSEditor-https://github.com/dseph/EwsEditor
3 – MFCMapi – https://github.com/stephenegriffin/mfcmapi
![]()