The need here was to create a completely airgapped – i.e. no admin accounts for logging into reporting dashboards – reporting mechanisms for managers across a tenant shared between 20 or more business units. The reporting was primarily to monitor licenses and how they were assigned, what usage the business unit was getting from that and other metrics which are useful to report on.
Part 1 – Using Power Platform and Graph for Office 365 Reporting – Part 1 – Users
Part 2 – Using Power Platform and Graph for Office 365 Reporting – Part 2 – License Assignments
Working backwards from the user there is really only Power BI in the stack that offers the reporting I want, i.e. cloud delivered, multiple highly customisation data sources, ability to quickly visually represent data and give end users easy to use slicers and exportable reports.
The data source for PowerBI then can be tables loaded with data directly, SQL databases, log analytics, csv files, etc. None of those seemed like fun so I am going with the Power Platform Common Data Service. This obviously means the loading mechanism is going to be equally “Power Platform-y” so lets go with some flows talking to MS Graph.
This post will talk about setting everything up and building the parts necessary to extract some users and details, stick them in CDS then connect PowerBI to CDS build a quick report and share it to some users.
(Yes there’s a downloadable Office 365 usage pack for PowerBI but I preferred to build up the data I was extracting bit by bit so I always know what is happening, yes I could use Log Analytics, odata queries direct to graph, powershell and sql or many other solutions which all have advantages, this is how to do it with Power Platform though:) )
I’m going to assume you have a powerapps license and environment set up. If you’ve never messed with powerapps head over to https://powerapps.microsoft.com/en-us/blog/power-platform-challenges/ and do some of the challenges there, really app in a day will let you see what the platform can do.
Graph Query
First thing we need is some data, about our users. We’re going to extract to from Microsoft Graph. Best place to start is Graph Explorer. If you go there you can run some practice queries to see how it all works then sign in so you can run against your real directory.
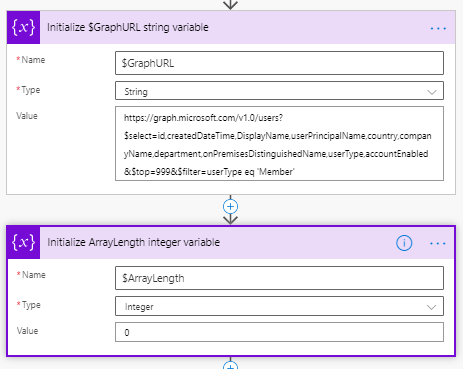
We are looking to get a user list so the query we will use is:
https://graph.microsoft.com/v1.0/users?$select=id,createdDateTime,DisplayName,userPrincipalName,country,companyName,department,onPremisesDistinguishedName,userTypeaccountEnabled&$top=999&$filter=userType eq 'Member'If you run this in graph explorer you’ll see it return the first 999 (the maximum value for top in the user space) user objects with the attributes requested in the select query. We’re only returning members as we are building a licensing report and guests are not in scope.
One of the main things to note is the results are paginated, the “@odata.nextLink” has a link to the next 999 results, that page will contain the next link, etc.
An important limitation of Flow (under most reasonable license situations) is it can only loop through a Do Until loop 5000 times, so if the set of results you are returning is larger than its maximum “top” value multiplied by 5000 we need to do some messing around when we come to build our flows. For this users import we can grab nearly 5 million users so I think we’ll be fine.
Data Entity
Now we have a data source we need somewhere to keep our data. In this case we’re going to use Power Platform Common Data Source. This is effectively a specialised database where you can define your own tables or entities or opt to use predefined ones. We’re gonna make our own because who wouldn’t.
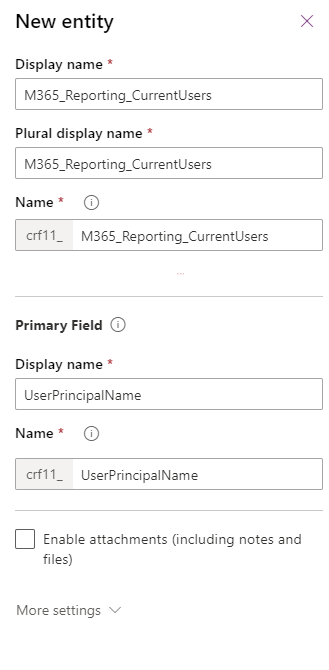
Head to make.powerapps.com and then Data | Entities and hit +New Entity. This is going to be a curent user source for M365 reporting so I called it M365_Reporting_CurrentUsers. The primary Field will be UserPrincipalName
Hit Done and it will run off and create the new entity. Once its there click into it. (As were working it will continue adding the standard fields) Click +Add Field and add the field as below:
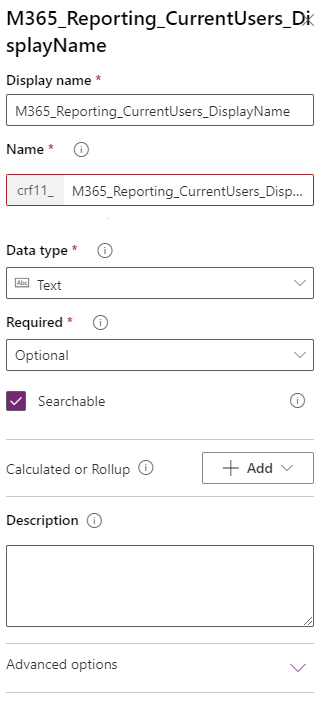
After that, do the same thing to add the rest of the fields we want:
| M365_Reporting_CurrentUsers_Created | Date and Time | |
| M365_Reporting_CurrentUsers_CompanyName | Text | 100 |
| M365_Reporting_CurrentUsers_Country | Text | 100 |
| M365_Reporting_CurrentUsers_Department | Text | 100 |
| M365_Reporting_CurrentUsers_DisplayName | Text | 100 |
| M365_Reporting_CurrentUsers_Enabled | Text | 100 |
| M365_Reporting_CurrentUsers_ObjectID | Text | 100 |
| M365_Reporting_CurrentUsers_OnPremDN | Text | 1000 |
| M365_Reporting_CurrentUsers_Seen | Date and Time | |
I also renamed my “userprincipalname” field to have the M365_Reporting_CurrentUsers_ prefix. Save the entity and we’ll end up with:
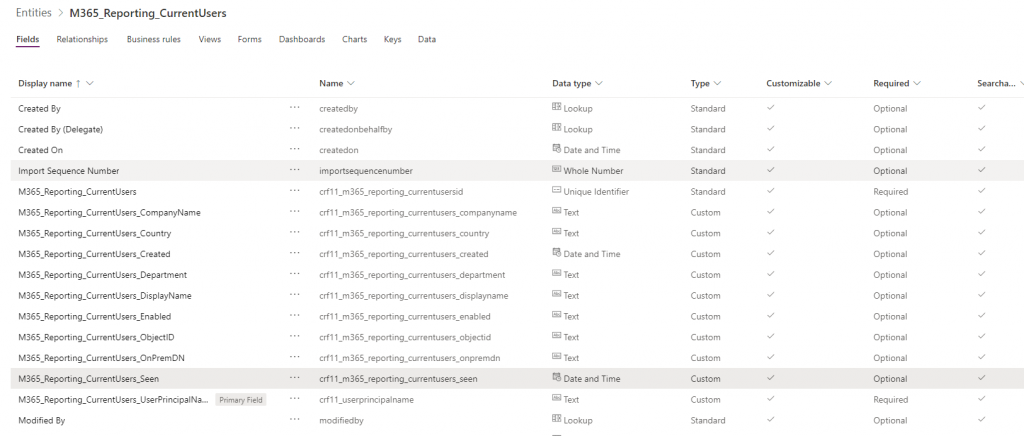
There is some optimisation we would do if this was a database we had to manage and optimise – E.G the string lengths are in many cases too long and different data types could be used.
Flow
We have our data storage location – CDS and we have our data source – graph. Now we just need to get data from one and stick it in the other.
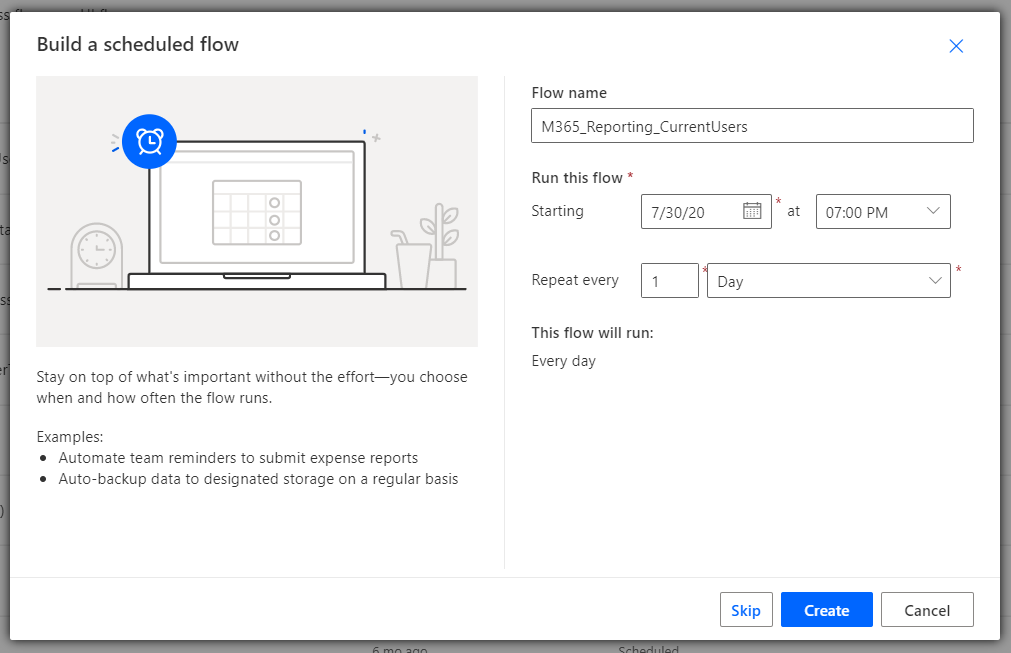
Still in make.powerapps.com, lets go to Flows, New Flow and create flow based on a schedule tht runs at 7pm every night
I’ll start at the end and work backwards – this is the flow I built for this task, we’ll look at each step in detail soon:

Your new flow will currently have the “Recurrence” task to run it every evening.
Next we initialise a string variable called $GraphURL with the value we figured out in graph explorer and a blank integer variable called $ArrayLength:
So the big issue with our results from graph is the pagination, we can only grab 999 users at a time then have to interrogate a different URL for the next 999. To deal with this we are going to use a Do Until loop in which the last step is to pick up the next page and put it into graph until it comes back blank:
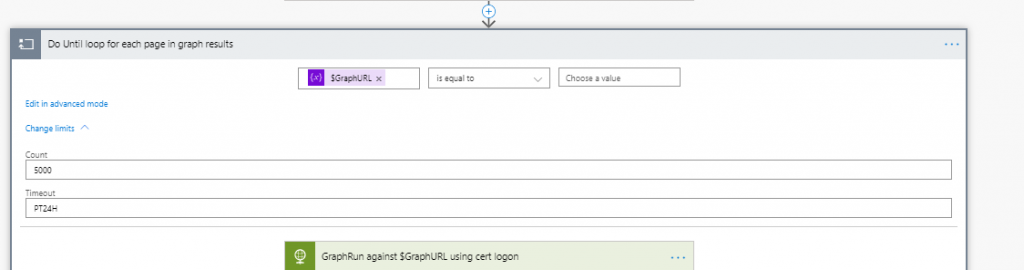
I’ve set the counter to 5000, the maximum so we definitely get all of or users. When you are testing I recommend setting this to 1 so it only grabs the first 999 and completes more quickly, once you want to run it live just set this back to 5000. I also have a 24 hour timeout.
Inside the loop the first thing we need to do is get the first page of results from graph. We need an HTTP action set to get to go and grab the results:
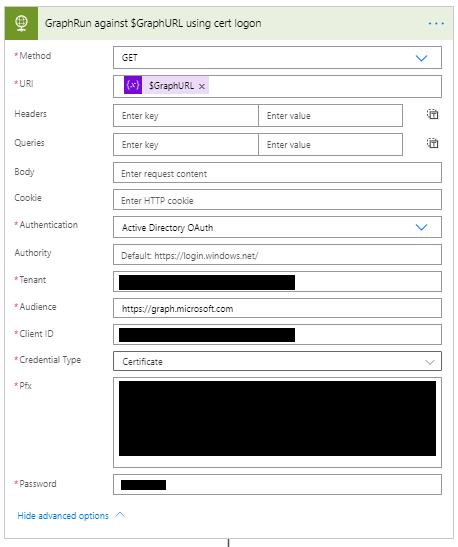
Okay, some stuff to unpack here. First off I’m using a application logon with a cert. You dont have to, I just prefer it to clientid/secret. I will go through how to set up an Azure Active Directory app for this in another post but basically, create the app, give it rights to read the directory, generate a cert and pfx then copy the entire pfx, password, client id an tenant id in here. One thing I hate about this – that password appears in plain text.
You can use any method to authenticate to graph you want, I just like using certificates when possible.
This will grab you results as a big old JSON page. We then need to convert that JSON into arrays with a Parse JSON task passing the html body from our http call above:
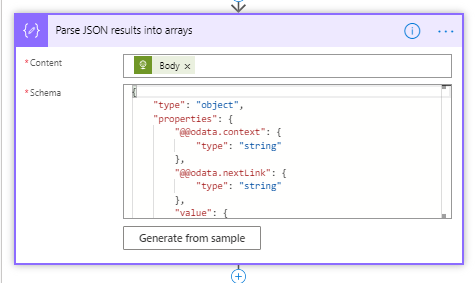
To quickly guesstimate the Schema you can get the output from Graph Explorer and paste it into the “Generate from Sample” mechanism which I would describe as “Okay”. It tends to mess up in one main way – If the first object ion your sample has a string it sets the type to string, if its nullable even if other objects in your sample have that attribute nulled it doesnt set that as a type.
So if you use the Generate Mechanism you will likely need to go through the schema and change
"country": {
      "type": "string"
       },
to
"country": {
"type": [
"string",
"null"
]
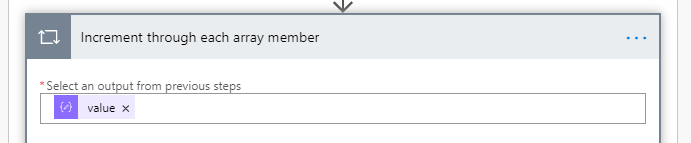
},Once your schema is sorted we are going to go through every array member to either add or update a CDS record so we need an Increment control to increment through each array value from the Parsed JSON file:
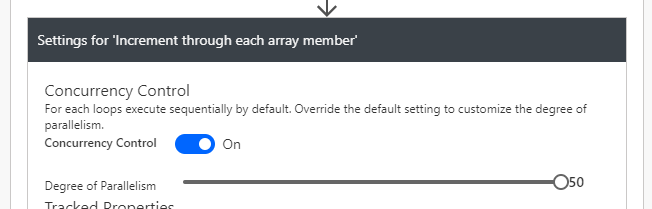
When you run a loop like this flow will default to running with no concurrency, great if you need each loop item to go through one at a time, we dont care so hit the breadcrumbs and max it out:
In SQL or most other data and code mechanism we can do the equivalent of “INSERT INTO IF NOT EXISTS” in a single query, we cant in Flow/CDS tthe first thing we need to do is interrogate CDS for any existing record for the user we are dealing with on this loop:
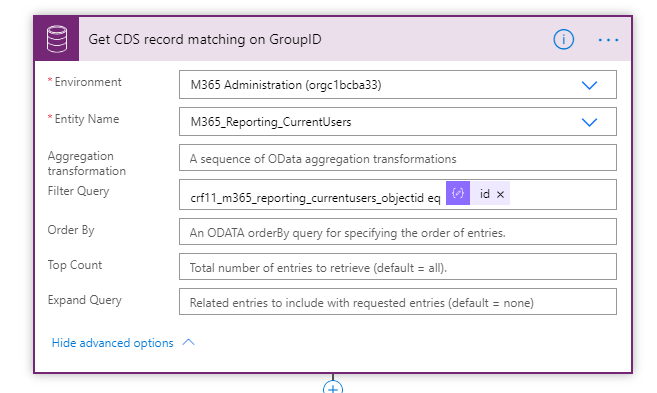
This returns any users in CDS who have auser object id equal to the id parsed from json for this loop.
Next we need a condition – if the above found a user we need to update that user’s record, if it didn’t we need to create a new record. We base this on a funtion evaluating the length of the aray retruned byt the CDS operation above:
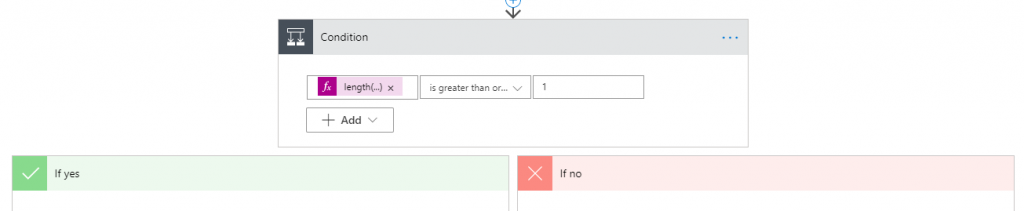
Function:
length(body('Get_CDS_record_matching_on_GroupID')?['value'])If this length is 1 or more it means the user exists in CDs and we’re going to update that record:
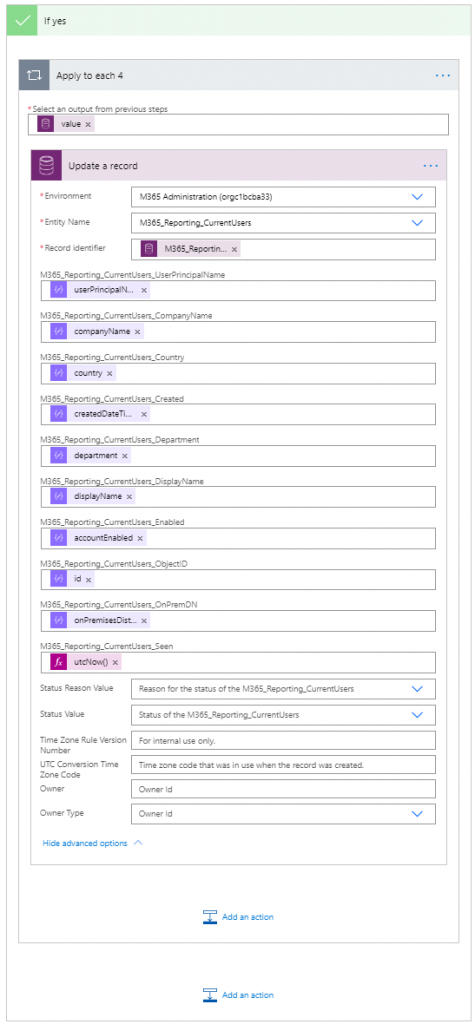
Some notes. You’ll see there’s an Apply to Each lop wrapping the CDS update, that will get updated automatically hen you populate the record identifier, because while we know there will only be one record matching the user object id filter we used Flow thinks there could be more so puts the loop in automatically. Its fine.
The field values are all from the parsed JSON and an issue here is that not all of them are going to be on the “dynamic content” box that pops up. I’m yet to figure out what exactly drives their visibility there since you can have attributes that are required or not, that are at higher and lower levels of the schema randomly appear. It doesn’t really matter – to add something in that inst there you can just type it as, for example:
@{items('Increment_through_each_array_member')?['department']}Which will appear as ![]()
A bit of a gotch when looping through a large array like this to perform actions on CDS is rate limits. If you leave everything as it is it will work but some of the updates will fail with a 429 – rate limit exceeded error.
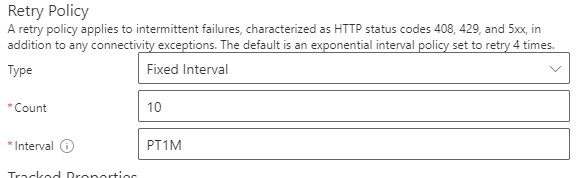
You can resolve this by opening the setting for the CDS update task and setting a retry policy, I usually go with 10 retries with a fixed interval of 1 minute:
Thats the “yes” side of the condition, i.e. for when an exisitng user record is found, the no side is basically identical but with a “Create New CDS record” task instead of an update. Obviously this can only add one record so you wont see flow add in a an apply to each control:
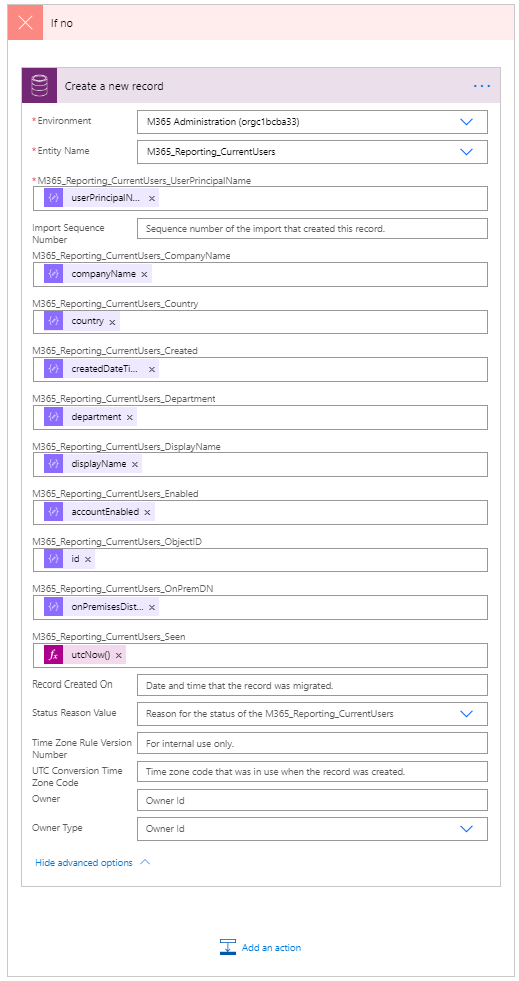
The same setting should be applied RE retries.
The last part of our loop will update $GraphURL with the next page of results from Graph:
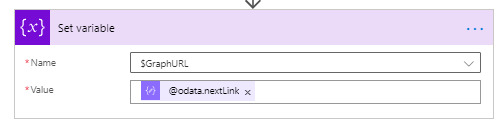
This will eventually be null when there are no more pages which completes the loop.
The whole thing should no be runnable and will grab the data and stick it in an entity. You are about to see that Graph+Flow+Common Data Service is NOT fast but we arent after real time here, we are after reporting data.
![]()